Thursday, May 5, 2016

1st Print

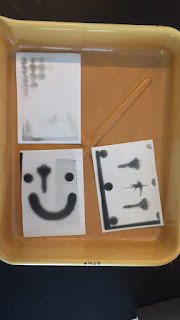
These are my Print 1 Pictures starting with my test strips and ending with my final big picture. 
1. First you have to take the pictures using the camera provided. 
2. Next you take the film out in the developing bag and then you put the roll of film through the chemicals.
3. Once you leave the film to dry, you pick five pictures and you make a test strip with the five pictures on the film. You do two seconds using the cardboard and your filter is on F8. Put through chemicals when done. 
4. Then you pick the picture that is the most clear and has black white and grey and you make another test strip using 2 seconds with the cardboard and using the filter F8. Put through chemicals. You then analyze how many seconds shows the black white and grey and you do it for that many seconds on the big piece of paper. 
5. Once you put it through the chemicals, your picture should have black white and grey, it should be clear, all edges should be even, and there shouldn't be any agitation marks on it. You then make once more big picture so you have two. 
6. Finally, post your hard work on blogger staring with your test strips all the way to the finished product. 

Tuesday, April 26, 2016

Camera Know How

1. Promaster Camera 13.
2. there is no on butten
3.The shutter Release
4. The Film speed dial
5. 1, 2, 4, 8,15,30,60,125,250,500,1000,2000
6.aperture ring
7. 1.7, 2.8, 4, 5.6, 8,11,16,22
8.focusing ring
9.yes
10.if the green light appears when you push the button half way down
11.you use the lens to adjust the light
12.you bracket by changing the f-stop that you using with the green light,and adjust the f-stop to one above the normal f-stop and one below.
13.kentmere 400 black and white film
14. The iso setting the sensitivity of the sensor to light
15.you turn the rewinding wheel clockwise

Tuesday, April 5, 2016

Positive and negative photogram


1.) You achieve white on a photogram by blocking all the light from hitting the light sensitive paper.
2.)You achieve light on a photogram by letting light hit it fully.
3.)You achieve gray on a photo sensitive paper by letting light hit it for a little bit or blocking light a little bit with magazine paper or tissue paper.
4.) Photograms are designed in the classroom because you can't design an image in the dark room because you ant see anything at all.
5.) You need to make a test trip first so that you can test the light and how long you have to expose it to the light.
6.) Photograms are referred to as painting with light because you use different objects to block the light at different percentages.
7.) Len Lye, Man Ray, and Michael Flomen.
8.) The developer brings out the light in the paper and makes it visible.
9.) The stop stops the developer from developing.
10.) The fixer makes the paper no longer light sensitive.
11.) The fixer remover removes the fixer.
12.) The final 3 minute wash, washes all of the chemicals off of the paper.

Wednesday, March 30, 2016

Adam Fuss Photogram Powerpoint


I was looking for a nice balance between a nice visual and informational powerpoint and i belilved i achieved it to the max.(:

Monday, March 14, 2016

negative pinhole camera

First, I started off by using smaller strips of photographic paper to figure out how much light i would need to create a nice clear image. I found out that around 20 seconds was a perfect time for my camera. After figuring out how many seconds i would need to use i then preceded to get a big piece of paper where once again i went outside and took a picture. Then i went back into the dark room and started developing my picture as the steps in there say. 
1. A camera obscure is a darkened box with a convex lens or aperture for projecting the image of an external object
2. A camera with a pinhole aperture and no lens
3. a camera has a light tight box, a photo sensitive medium, and a aputure 
4.The apeture and the lid
5.by testing with test strips to see if they turn black or a medium grey. you can fix them by improving the darkness.
6.Camera shake is simply just when the camera is being shaken while taking a photo it can be avoided by putting your pinhole camera down on a stool.
7. the developer helps the clarity of the photo 
8. it just clears up the photo and makes the photo stay clear.
9. the fixer just covers up any blemishes or anything thats wrong with your photo.
10. couldn't find this last question and you said it was okay and to just post it 

Wednesday, February 10, 2016

Rules of composition

These are the rules of composition, Mrs. DuVarney had us learn these rules in order to have a better understanding for the up and coming weeks to benefit  us in the long run.

Thursday, January 21, 2016

TB 12


last prodject


Animal Prodject

My strongest aspect of this project is how my picture is really popping from the background. I think the contrasts of colors really lifts the tiger off the page and gives him a lot of  life like he's actually alive. I think that i picked a great picture and i really like how his mouth is open like he is roaring, i think that it gives the picture a cool feature and really gives the picture characteristics. it could of been a little better but i think i did a great job with the face.
     The only thing that was easy about this project was making it look natural i don't think i had much trouble doing it. For example the colors look pretty well put together. I didn't have much trouble finding an orange that would fit the actual tiger mainly because i used the eye dropper to take it from the tiger picture i had.
    The objective of this project was to make a animal look as live as possible. I think my project  looks very natural and exactly how it would look if you were to put it up to a real tigers face. If I could do this project over again i wouldn't  pick a easier picture  to do, mainly because i like tigers but doing all the detail on his face was very time intensive.